VObject 제작 을 먼저 읽어주세요
VObject에서 플레이어가 조작할 수 있는 기능을 추가하는 방법을 알아봅시다.
VivenGrabbable Module 사용법
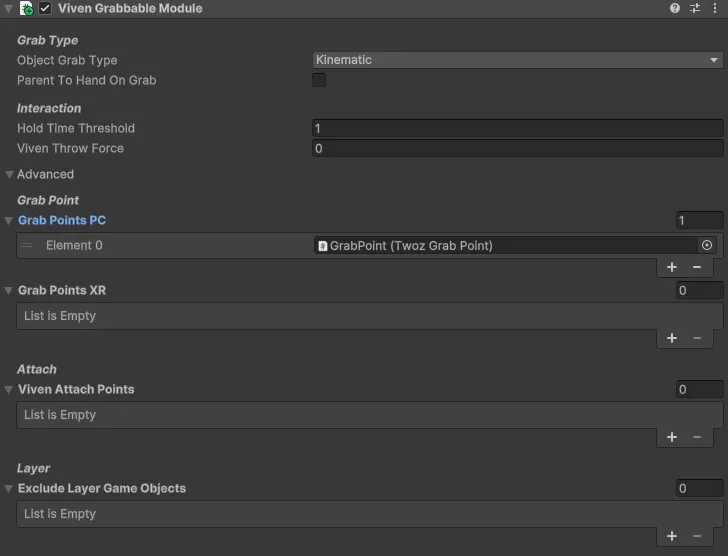
VObject에 상호작용을 추가하려면 VivenGrabbableModule을 추가합니다.
GrabbableModule은 다음과 같은 기능을 제공합니다.
•
Grab 모드
•
Place 모드
Grab 모드에서는 물체를 잡고 이동하거나, 기능을 사용할 수 있습니다. Grab 모드에서는 물체가 플레이어의 손을 따라다닙니다.
다음 이벤트를 VivenBehaviour에서 정의해 기능을 설정할 수 있습니다.
•
onGrabEvent 플레이어가 오브젝트를 잡았을 때 발생하는 이벤트입니다.
•
onReleaseEvent 플레이어가 Grab 모드를 종료했을 때 발생하는 이벤트입니다.
•
objectShortClickAction물체를 잡고 있는 채로 짧은 클릭을 하였을 때 발동합니다.
•
objectLongClickAction물체를 잡고 있는 채로 길게 클릭을 하고 뗐을 때 발동합니다. 길게 클릭의 기준은 1초 입니다.
•
objectHoldActionStart물체를 잡고 있는 채로 길게 클릭을 유지할 때 발동합니다.
•
objectHoldActionEnd물체를 잡고 있는 채로 길게 클릭을 유지하다 뗐을 때 발동합니다.
HoldAction과 ClickAction을 같이 사용할 경우 실행 순서를 보장할 수 없습니다. 두 이벤트 종류를 같이 사용하는 것은 권장되지 않습니다.
Place 모드에서는 물체를 배치할 수 있습니다. 다른 물체에 부착하거나 원하는 위치로 이동, 회전시킬 수 있습니다.
Grab 모드의 이벤트들은 VivenLuaBehaviour에서 등록할 수 있습니다.
동명의 함수를 lua 에서 정의하면 이벤트와 함께 호출됩니다.
명시적으로 event에 callback 함수를 등록할 수도 있습니다.
function start()
-- grabbableModule을 가져옵니다.
grabbableModule = self:GetComponent("GrabbableModule")
-- 명시적 Callback 함수 추가
grabbableModule.onGrab:AddListener(Foo)
end
function Foo()
Debug.Log("Grabbed")
end
-- objectShortClickAction 이벤트 함수
-- 물체를 잡고 Action 버튼을 짧게 눌렀다 땠을 때 호출됩니다.
function objectShortClickAction()
Debug.Log("objectShortClickAction : Shoot")
end
Lua
복사
VObject 를 다시 빌드하면 Grab, ShortClick 시 로그가 출력되는 것을 확인할 수 있습니다.
Grab Hand Pose, GrabPoint 설정
GrabbableModule 은 Grab 시 손의 모양과 위치를 설정할 수 있습니다.
GrabbableModule의 Advanced를 클릭합니다.
Grab 시 손의 중심에 GrabPoint가 위치하게 됩니다. VR과 PC에서 별도의 GrabPoints를 설정해 다양한 사용자 경험을 제공할 수 있습니다. GrabPoint를 설정하지 않을 시 물체의 중심이 GrabPoint가 됩니다.
GrabPoint는 GameObject 에 TwozGrabPoint 컴포넌트를 추가해 만들 수 있습니다.
EditorGUI를 통해 Grab 시 손의 회전, 위치를 확인할 수 있습니다. 설정한 GrabPose는 ScriptableObject로 저장해 다른 VObject와 공유할 수 있습니다.
Attach Point는 Place 모드 시 다른 오브젝트를 붙일 수 있는 지점입니다. 조립하거나 쌓을 수 있는 물체(블럭, 벽돌 등)을 구현하려면 Attach Point를 지정해야 합니다. 자세한 내용은 TwozAttachPoint 문서를 참고해주세요.
VivenLuaBehaviour 동기화
RPC를 사용한 동기화
장난감 총을 눌렀을 때 공이 발사되는 기능을 추가하겠습니다.
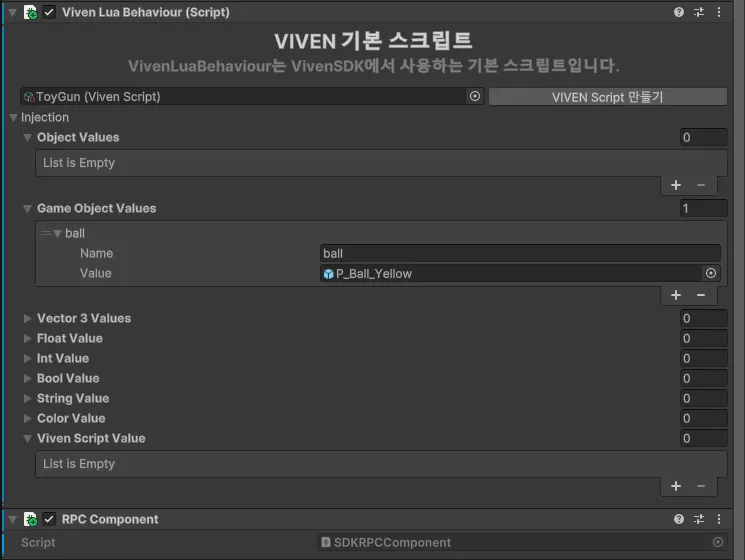
ToyGun에 RPCComponent를 추가하고, VivenLuaBehaviour의 injection에 공 GameObject를 추가합니다.
VivenLuaBehaviour은 클라이언트에서 실행됩니다. 다른 클라이언트에서도 동시에 함수를 실행하려면 RPC 를 사용해야 합니다.
--- injection
-- ball : GameObject (P_Ball_Yellow)
---
local rpcComponent -- RPC 컴포넌트
local ballRigidBody = nil
function start()
-- rpc컴포넌트를 가져옵니다.
rpcComponent = self:GetComponent(typeof(RPCComponent))
-- ball의 Rigidbody 컴포넌트를 가져옵니다.
ballRigidBody = ball:GetComponent("Rigidbody")
-- 공을 비활성화합니다.
ball:SetActive(false)
end
-- objectShortClickAction 이벤트 함수
-- 물체를 잡고 Action 버튼을 짧게 눌렀다 땠을 때 호출됩니다.
function objectShortClickAction()
-- 플레이 모드가 PC 일 경우 카메라의 중앙으로 발사합니다.
if Player.Mine.PlayMode == "PC" then
local screenCenterPoint = Input.mousePosition
local ray = Ray(self.transform.position, Camera.main:ScreenPointToRay(screenCenterPoint).direction)
shootForce = ray.direction * 100
else
-- VR 모드일 경우 총의 Forward 방향으로 발사합니다.
shootForce = self.transform.forward * 55
end
-- 내 클라이언트에서 shoot 함수를 실행합니다.
shoot(shootForce.x, shootForce.y, shootForce.z)
-- RPC를 호출해 다른 클라이언트에서도 shootSync 함수를 실행시킵니다.
rpcComponent:SendRPC("ToyGun", "shootSync", RPCSendOption.Others, shootForce.x, shootForce.y, shootForce.z)
end
--- 클라이언트용 함수
function shoot(x, y, z)
shootForce = Vector3(x, y, z)
ballClone = GameObject.Instantiate(self.gameObject, ballSpawnPoint.transform.position, ballSpawnPoint.transform.rotation)
ballClone:SetActive(true)
ballRigidBody:AddForce(shootForce)
end
--- RPC 용 함수
function shootSync(x, y, z)
shootForce = Vector3(x, y, z)
ballClone = GameObject.Instantiate(self.gameObject, ballSpawnPoint.transform.position, ballSpawnPoint.transform.rotation)
ballClone:SetActive(true)
ballRigidBody:AddForce(shootForce)
end
Lua
복사
RPC 를 사용해 다른 장난감 총 발사 기능을 구현했습니다.
SyncTable을 사용한 동기화
문서 추가 예정
사운드 이펙트 추가
Viven 에서는 FMOD를 사용해 사운드를 재생할 수 있습니다. FMOD 라이브러리를 설치해 직접 Sfx를 추가하거나 VivenEventInstance 를 사용해 AudioClip을 FMOD에서 재생할 수 있습니다.
Viven Event Instance
Viven Event Instance 컴포넌트를 사용해 손쉽게 AudioClip을 재생할 수 있습니다.
audioClip
재생할 audioClip을 설정합니다. 등록한 audioClip은 VivenBehaviour 에서 재생할 수 있습니다.
audioClip의 볼륨은 mixerGroupType에 따라 제어됩니다.
audioClip은 FMOD의 eventInstance로 변환되어 저장됩니다. 여러 audioClip을 추가하는 것은 메모리 용량을 증가시킬 수 있습니다.
mixerGroupType
Viven 에서는 다음과 같은 카테고리로 소리를 재생할 수 있습니다.
•
Environment
•
Sfx
•
Bgm
Environment는 바람 소리, 새 소리와 같이 VMap에서 기본적으로 재생되는 소리입니다.
Sfx는 오브젝트, 맵과 상호작용하는 과정에서 생기는 소리입니다. 총을 발사하는 소리, 맵의 이벤트에서 발생하는 소리 등 대부분의 소리가 포함됩니다.
Bgm은 맵 전체에 재생되는 배경음악입니다. 맵의 배경음악을 설정하거나 위치에 상관없이 동일한 소리를 재생하는 경우 사용할 수 있습니다.
배경음악 재생을 동기화하는 기능은 현재 미구현 되어있습니다. 재생 시간, 현황은 동기화되지 않을 수 있습니다.
플레이어들은 환경설정에서 각 카테고리 별 크기를 조절할 수 있습니다.
VivenBehaviour 작성
장난감 총에 효과음을 추가하면서 사운드 재생 방법을 알아봅시다.
먼저 ToyGun 프리팹에 Viven EventInstance컴포넌트를 추가합니다.
•
MixerGroupType 을 Sfx 로 설정합니다.
•
AudioClip 은 VivenBehaviour에서 설정하기 위해 비워둡니다.
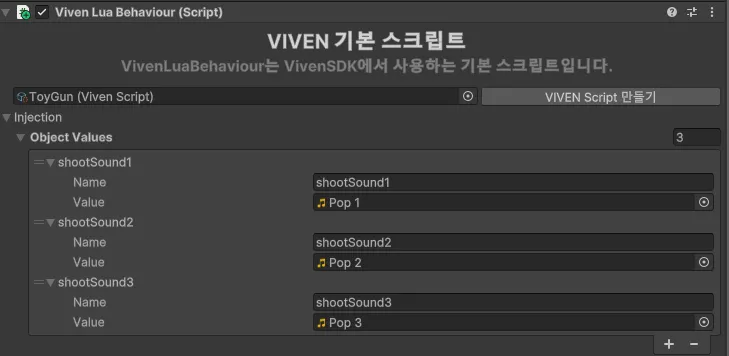
VivenBehaviour 의 Injections 에 재생할 효과음들을 추가합니다.
ToyGun.lua 에서 사운드를 재생합니다.
--- injection
-- ball : GameObject (P_Ball_Yellow)
-- shoootSound1 : AudioClip (Pop 1)
-- shoootSound2 : AudioClip (Pop 2)
-- shoootSound3 : AudioClip (Pop 3)
---
-- 효과음 재생 컴포넌트
local eventInstance
-- 재생할 audioClip 목록
local shootEffectSounds = {}
local rpcComponent -- RPC 컴포넌트
local ballRigidBody = nil
function start()
-- rpc컴포넌트를 가져옵니다.
rpcComponent = self:GetComponent(typeof(RPCComponent))
-- ball의 Rigidbody 컴포넌트를 가져옵니다.
ballRigidBody = ball:GetComponent("Rigidbody")
-- VivenEventInstance컴포넌트를 가져옵니다.
eventInstance = self:GetComponent("VivenEventInstance")
-- 테이블에 AudioClip을 추가합니다
table.insert(shootEffectSounds, shootSound1)
table.insert(shootEffectSounds, shootSound2)
table.insert(shootEffectSounds, shootSound3)
-- 공을 비활성화합니다.
ball:SetActive(false)
end
--[[
중략....
]]--
--- 클라이언트용 함수
function shoot(x, y, z)
shootForce = Vector3(x, y, z)
ballClone = GameObject.Instantiate(self.gameObject, ballSpawnPoint.transform.position, ballSpawnPoint.transform.rotation)
ballClone:SetActive(true)
ballRigidBody:AddForce(shootForce)
-- 재생할 audioClip을 설정합니다.
eventInstance.audioClip = shootEffectSounds[shootSoundIndex]
-- Sfx를 1회 재생합니다.
eventInstance:PlayOneShot()
end
--- RPC 용 함수
function shootSync(x, y, z)
shootForce = Vector3(x, y, z)
ballClone = GameObject.Instantiate(self.gameObject, ballSpawnPoint.transform.position, ballSpawnPoint.transform.rotation)
ballClone:SetActive(true)
ballRigidBody:AddForce(shootForce)
-- 재생할 audioClip을 설정합니다.
eventInstance.audioClip = shootEffectSounds[shootSoundIndex]
-- Sfx를 1회 재생합니다.
eventInstance:PlayOneShot()
end
Lua
복사
효과음을 한번만 재생하려면 VivenEventInstance:PlayOneShot() 을 사용합니다. PlayOneShot은 효과음 인스턴스를 생성합니다. PlayOneShot()을 여러 번 실행하면 효과음이 중첩되어서 생성되며, 기존에 재생중인 효과음은 중단되지 않습니다. 효과음을 한 개만 실행하고 싶다면 VivenEventInstance:Play() 를 사용합니다. Play()는 설정된 AudioClip을 재생하며 Play()가 다시 호출되면 기존에 재생중인 효과음을 중단합니다. Stop() 을 호출하면 재생중인 효과음을 중단합니다.


